Drawing is one of the most accessible forms of creativity for a child. From an early age, the little ones are drawn to the writing materials in their field of vision to create their masterpiece on a sheet of paper, in their favorite book or on the wall of their children's room.
In the process of teaching drawing, they go through several stages:
- up to 2 years, this drawing of spontaneous lines - a kind of "test pen";
- from 2 to 4 years old the child is already consciously trying to portray the sun, a little man or a typewriter, although most often these pictures can be deciphered only by the author himself;
- from 5 to 8 years, children create inept drawings in which their thoughts are reflected; in these "paintings" the plot is already well traced;
- children, keen on drawing, continue their education, acquiring theoretical knowledge and practical skills in general education and art schools.
Our today's article is about how to learn how to draw a plane. Of course, it is more child-oriented, but it can be useful to adults who do not know how to help draw a plane to their child. After all, sons often pose a dead-end with their requests to help them with a drawing of an airplane or a tank for children.
If the kid asks for your help, your task is not just to show him the right picture or draw for him (as some overly caring parents do). Take two sheets of paper and follow this drawing with the child, explaining to him on an example how correctly to draw a plane. Show the sequence in which you want to represent individual parts, so that the result is the desired military or civilian aircraft. As a rule, you should draw a plane with a pencil, so that you always have the opportunity to correct an incorrect line.
And now attention - we learn how to draw a plane together!
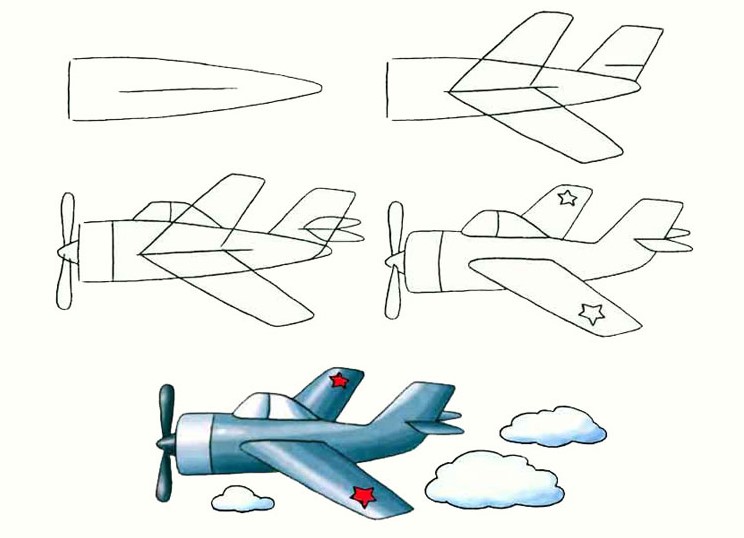
1. Step by step instruction on drawing an airplane for toddlers:
- In the middle of a sheet of paper we draw the plane body (fuselage);
- add wings (they seem to "grow" from one conditional line) and tail;
- In front we draw a propeller, on top - the cockpit of an airplane, and behind - its tail empennage;
- wipe the eraser with unnecessary lines, add small details (such as stars on the wings);
- finish the drawing - paint it in the color you like, use the eraser to add highlights;
- Do not forget about the background of the picture - of course, it will be the sky and clouds.
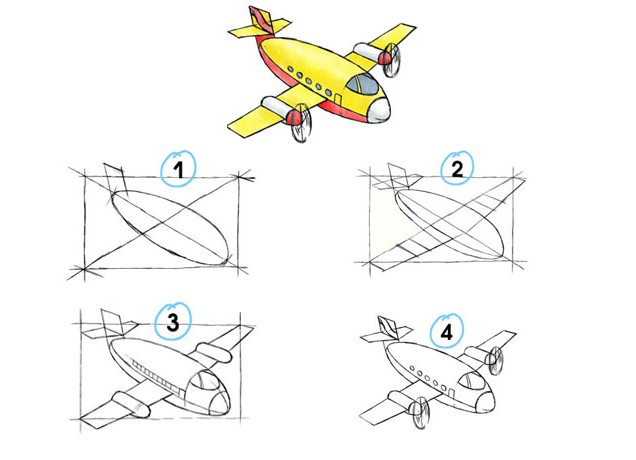
2. Master class for older children: we draw a passenger plane:
- First, draw a rectangle into which the airplane figure will be inscribed;
- then draw the wings and tail to the body of the aircraft;
- work out rough details: depict the cockpit, keel and tail, portholes for passengers;
- erase the outer rectangle and other auxiliary lines - they are no longer needed;
- add propellers on the wings of the aircraft, hatch show the movement of air during the flight. Finish as fine as possible all the small details and paint the picture.
3. How to draw a military aircraft:
- sketch the main axes with a pencil (bear in mind that a military aircraft, unlike a passenger plane, has a generalized triangle shape);
- make the nose of the future fighter long and pointed, and the wings - not too long and with blunt ends;
- On the wings of a military aircraft put the flaps and spoilers - the elements that give military aircraft greater maneuverability and speed;
- paint the fighter to your liking, giving it, for example, a military protective coat ("khaki").
The learning process is decomposed into stages so that the child is more understandable. In the process of drawing, explain to him how this or that part of the aircraft is called and why it is needed. Make sure that your young artist respects the proportions in the drawing process. A child of 5-7 years old can already explain the basics of composition drawings - so his works will become more expressive.