Playing with the child various geometric figures, you help him develop spatial thinking and imagination. He begins to understand what square, round, cubic, spherical, and rectangular means and can easily imagine it in his head. Even to pupils at school in the lesson of geometry, teachers always show mock-ups of various figures, which contributes to better assimilation of geometric theorems and axioms. And, perhaps, the most difficult and difficult-to-pronounce word for a child is the "parallelepiped". In order to master this figure and understand its patterns, we suggest that you and your child make a parallelepiped of paper with their own hands.
To do this you will need:
- thick paper (but not cardboard, otherwise the child will do such a hassle of many difficulties), you can use a sheet from the album;
- pencil;
- ruler;
- scissors;
- PVA glue.
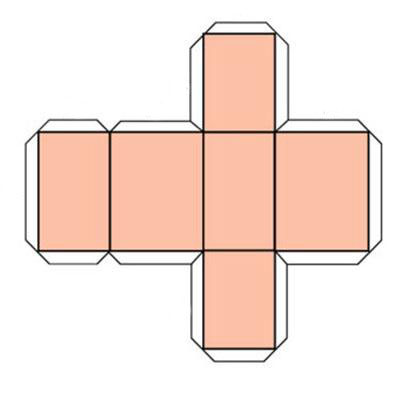
To understand how to make a parallelepiped of paper, you need to remember how it looks and what it is. This figure has 6 faces, each of which is a rectangle. Therefore, the scan will consist of 6 interconnected rectangles in the same plane.
1. As well as any volumetric figure, the parallelepiped has length, width and height. It is from their value that the size of the forgery will depend. Define the desired quantities and write them down.
2. We proceed to draw a diagram of a rectangular parallelepiped on paper. Remember that the paper should not be too thin, it will easily get wet from the glue and warped, then the figure does not turn out even, and excessively thick cardboard will not bend well and will crack on the bends.
3. Draw a horizontal line, the length of which is equal to the sum of the width and height, multiplied by two. Then from each end of the line we lower the perpendicular equal to the length of the assumed parallelogram. Between them draw a line parallel to the first.
4. Now, from the upper right corner, we plot the height of the parallelogram, then the width. Then again the height, and again the width. From the points obtained, draw perpendicular lines to the opposite side, which will be equal to the length of the parallelogram. So we got 4 faces of the shape. There are 2 more left.
5. Above the second rectangle on the right, we add two more to the bottom and above. In this case, from the second mark on the right, which we did in step 4, draw a perpendicular upward equal to the height of the figure. Repeat the same from the second mark. We connect the perpendiculars by a segment equal to the width of the parallelogram. In a similar way, we construct the bottom rectangle on the opposite side.
6. In order to make it easier to glue the parallelepiped from paper, add additional "wings" to the drawing, as shown in the figure. Their width should be about 1.5 cm. It is also necessary to make them beveled corners (45 degrees), so that when glued they do not look outward.
So, the parallelepiped scan of the paper is ready. It is important that all the details of the drawing are level and strictly measured, otherwise the figure does not stick together evenly and will be a curve.
7. Cut the workpiece and bend it along all the lines so that our sides touch, and the top and bottom rectangles become the "bottom" and "cover" of the figure.
8. Lubricate the additional "wings" with glue and collect the parallelepiped by refilling them inside. Let's wait until the glue dries.
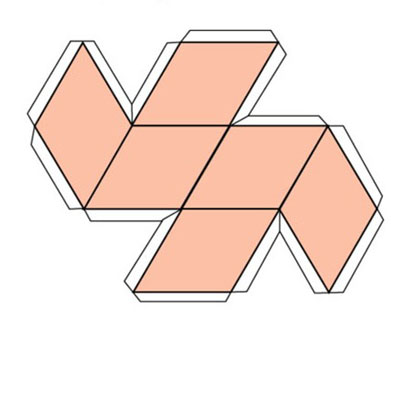
If you have mastered the manufacture of this figure, you can proceed to collect an inclined parallelepiped of paper, whose edges are acute-angled diamonds.
- By analogy of the first figure, draw a diagram, as shown in the figure. As you can see, all faces of the inclined parallelepiped are the same and all sides of diamonds are equal.
- Add to the picture additional wings for gluing.
- Gently pick up the figure.
Parallelepiped - a fairly simple geometric figure, mastering which you can go to others - to create a pyramid of cardboard or paper, for example, icosahedron .