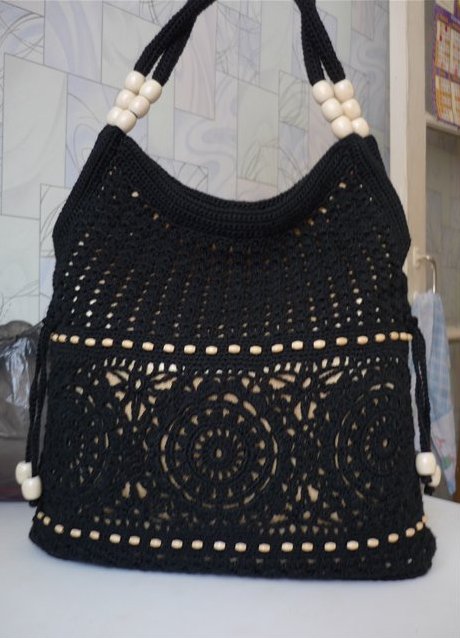
Crochet bags can be very different: large and small, crocheted in a variety of techniques. It can be handbags as completely connected, starting with pens and ending with various straps, as well as knitted bags made with a variety of accessories: ready-made pens, straps, plaques, fasteners, etc. You can also partially decorate with knitting a ready-made bag, wearing a bundled "cover" on it.
Master class on knitting bags
First we need to associate several circles according to the following scheme:
For the circle, we select a chain of 6 air loops and close them in a ring.
In the second row we knit 3 air loops for lifting and 15 more columns with a crochet.
3 row - we knit 3 air loops for lifting, we also sew one air loop and then we knit a column with a crochet, 1 air loop, repeat the pattern 15 more times, that is, we knit the columns with the cake in the columns with the cake of the previous row, and between them - air loops.
4 row - we make a column without a crochet on a column with a crochet of the previous row, then two columns without a crochet under the air loop. Repeat the pattern to the end of the row.
5 row - we sew 4 air loops and 2 bars with two tops with a common top, 3 air loops, 3 columns with two tops with a common top, 3 air loops - repeat to the end of the row. In total, we bind 16 such groups.
6 row - a column without a crochet in the middle loop of a group of columns with two nakidami, 3 columns without a crocheted under a chain of air loops.
7 row - a column without a crochet in the middle loop of a group of columns with two nakidami, 4 air loops - repeat 16 times.
8 row - under a string of air loops - a column without a crochet, 2 stitches with a crochet, a column with two crochets, 2 stitches with a crochet, a column without a crochet-repeat 16 times.
9 row - 4 air loops for lifting, 3 air loops, main pattern - column without a cap over a column with 2 nakidami, 3 air loops, a column with two capes, 3 air loops - repeat to the end of the row.
10 row - 3 posts without a crochet under a chain of three air loops - repeat to the end of the row.
11 row - a column without a crochet in the second column from the group of three columns without the cusp of the previous row, 3 air loops - repeat to the end of the row.
The first circle is connected. We knit the rest of the circles in the same way, when knitting the last row we connect at 6 points with the previous circle (green check marks of the same circle and red tick marks of the other circle).
Having connected and having connected 6 circles, we begin to tie up from above and from below elements to level a cloth of a bag, to make it rectangular. To do this, we connect 6 air loops into a ring, then we sew 5 air loops. Without a crochet we join the air loop of the circle, we sew 5 air loops, join the column without a crochet to the ring of 6 air loops.
We impose 3 air loops, attach to the next arch of three air loops, 3 air loops, join the ring of 6 air loops.
2 air loops, attach to the next arch of three air loops, 2 air loops, join the ring of 6 air loops.
4 air loops, attach to the next arch of three air loop loops and to the same arch of the second circle at the same time, 3 air loops, join the ring of 6 air loops.
2 air loops, attach to the arch of the three air loops of the second circle, 2 air loops, join the ring of 6 air loops.
3 air loops, attach to the next arch of the three air loops of the second circle, 3 air loops, join the ring of 6 air loops.
3 columns without a crochete we close in a circle from 6 air loops.
These elements are connected circles at the top and bottom.
Then we will fasten in a circle 5-7 rows with columns without a crochet and begin to knit with a pattern.
1 row - 3 stitches with a crochet for lifting, 3 stitches with a crochet, skip 3 columns with a crochet on the previous row (on the diagram these are circles) and in the next column tie 4 stitches with a crochet - knit to the end of the row.
2 rows - 3 air lifting loops, a column with a crochet between a group of 4 bars with a crochet, an air loop, 2 bars with a crochet at the same point, 2 bars with a crochet between a group of 4 bars with a crochet, an air loop, 2 columns with a crochet in the same point. Repeat the pattern until the end of the row.
The third and the following series: repeat the 2nd row.
Having knitted 10 rows, we divide the knitting into three parts, we leave the middle part, and on the two extreme ones we cut out two triangles by partial knitting, cutting in each row the number of columns with the crochet next to the left columns.
Having tied both halves of the bag in this way, we will make the strapping - 6 rows of columns without a crochet in a circle, tying 3 loops together in the corners and in the projecting corners - 3 poles without a crochet from one column without a crochet.
For a white bag knit the bottom of the columns without a crochet and attach to the bag.
For black we will first bind 3-4 rows of pattern and attach the bottom of the bag to it.
For the bottom, you need to type a string of air loops a little less than the length of the bag and knit in a circle (oval) columns without a crochet the desired length, which is equal to the length of the bag. The shorter the initial chain, the wider the bottom.
We knit cords for pens and ornaments: we collect 6-8-10 air loops, we close in a circle and we knit in a spiral up to the necessary length. For handles, the cord is as thick as possible - to collect more initial loops.
| | |