Surely every girl has her own little casket, which stores jewelry or jewelry. We in the master class will offer you the option of creating a casket with your own hands, which does not require the cost of materials, because the basis of this casket is a regular newspaper.
Weaving of a casket from newspapers
To manufacture a casket from newspapers with our own hands, we will need the following consumables:
- newspapers (the more, the better);
- scissors;
- spoke;
- adhesive clerical, you can use a conventional PVA;
- primer;
- Water-based paint for damp turquoise rooms;
- acrylic colors of burgundy and gold colors;
- brushes for painting the box;
- sponge;
- stencil, but we will produce it ourselves in the master class;
- fabric, which is 4 product diameters;
- pins.
Box of newspapers with own hands
Now, when everything is ready for work, we begin to weave boxes from newspapers.
1. We take the newspaper and along the page we mark out the 6 cm wide strips, cut the newspaper and get the future elements from which the weaving will be made. To shorten the time, we can connect several pages of paper using staples, so we do the job several times faster, cutting simultaneously more pages.
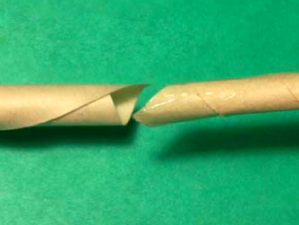
2. Next, wrap the paper strip on the spoke in a spiral to form a tube. When winding, the upper edge of the needle should look out of the paper so that the spoke can easily be removed. The tip of the wound strip is glued with glue and we close the spiral, then take out the needle, and the first tube is ready. Using the same technology, make the remaining tubes. Their number depends on the size of your product.
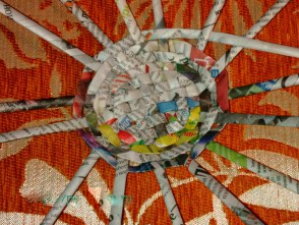
3. We proceed directly to the weave. Let's start with the bottom: take 8 strips, place 4 horizontally and 4 vertically and weave them in a checkerboard pattern.
4. Choose any end of the paper vine, wrap and continue the weaving of the working vine in a circular, until we reach the desired diameter of the box.
5. When the working vine ends, it needs to be increased by gluing another vine. To insert one vine into the cavity of the other, it is necessary to cut off the corner from the first tubule, since it is soft. Then glue the vine that will be inserted into the other, and connect the two tubes by placing the end of one tube at a distance of about a centimeter inside the other.
| | | |
6. Having reached the necessary diameter of the box, we proceed to weaving the walls of the product. To do this, all the tubes, except for the working vine, rise vertically. With the working vine, continue the weaving, creating the height of the casket. We recommend to put the jar inside the product, so that the bottom does not buckle, and the walls are even.
7. Having reached the desired height of the product, go to the processing edge of the box. We bend the tubes under the horizontal rows, cutting off the excess vines. It is also necessary to rotate the tubes in staggered order. One tube is bent inside the product, the other outside.
8. Now, when the capacity of the casket from the newspapers is ready, we need to create a lid of the casket. The lid is made in the same way as the main container, however, you should pay attention to the diameter, it should not be much larger than the diameter of the casket, which will allow the lid to cover the casket without any tightness and at the same time hold tight without flailing.
9. At this weaving the casket is finished, both parts are completely ready. However, before painting the product must be primed, which will allow the paint to lie evenly and give a shine to the product. The box looks great already, but there is still color and decor in front.
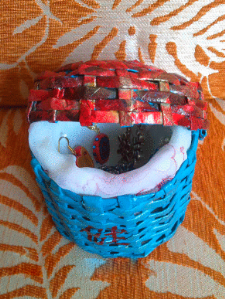
10. Now go to the painting of the box. With the help of a sponge or a brush, we paint the outer, and after drying and the inside of the casket, with a turquoise paint. The color of the lid is made with two colors: on the inside, the lid is colored with turquoise, and with the outer lid - maroon. After painting, leave the product for a while, letting it dry completely.
11. Now proceed to decorate the box. We take the gold paint and a semi-dry sponge, with light movements we put gold on the outside of the box. Also, using the sponge cover the bottom edge of the lid.
12. Leave the paint to dry for a few hours, the box should dry completely again.
13. Now we will create a stencil to create a picture on the casket. We will execute as a picture the Chinese character, meaning "Health". For this we print on the printer an image of a hieroglyph, the font size is chosen based on the size of the casket. Now using the nail scissors, we cut out the inner hieroglyphic pattern, turning the sheet into a stencil.
14. Now apply the stencil and holding it with your fingers fill with burgundy paint slits. If you chose a large-scale stencil, then it is better to use a self-adhesive stencil film on which you will create your stencil. The film fits snugly against the surface and prevents the ink from penetrating beyond the image. After drawing the picture, the film is easily removed.
15. Outside the box is already completely ready. We will take care of its interior finish: by measuring the diameter of the bottom of the box, as well as the height and length of the side wall, cut out of foam polyurethane (you can also use foam) of the workpiece.
16. Insert the round piece on the bottom of the box. We place the second workpiece along the entire wall of the box from the inside.
17. We take pre-prepared matter and, wrapping the edges of the fabric behind the side walls between the box and polyurethane foam, drape the inner decoration of the box.
18. We put in the walls pins - it's hangers for our jewelry. On the bottom of the box you can put necklaces, bracelets and rings, and hang the earrings on improvised hangers.
| | |