There is nothing more pleasant than on a sultry summer day to relax a little from the summer quests near your own pond, enjoying the coolness coming from him and watching the game of dragonflies above the surface of the water. There are many ways to make your own hands a small decorative pond in the garden, but it will be easier and more budgetary to build it from an old bath. Fill the drain hole of the bath with rubble, dig it into the ground and fill it with water - this is the simplest version of the construction of the reservoir on its site. But in this method there are significant drawbacks: first, the correct geometric shape will immediately give out the artificial nature of your pond, and secondly, white enameled walls will quickly overgrow with green bloom and create an unpleasant impression. Therefore, when building a reservoir from an old bath, it is necessary to take this into account, trying to smooth out its outlines and masking the white walls.
We need:
- old bath;
- cement-sand mixture;
- gravel or crushed stone;
- clay;
- adhesive solution for tiles or tiles;
- aluminum or steel mesh;
- metal wire;
- natural stones for decoration;
- Master OK;
- pliers;
- scissors for metal.
Manufacturing
- To begin with, it is necessary to determine a place suitable for our decorative reservoir from an old bath. For these purposes, an ideal site near the fruit tree, not much shaded, dry and with a fairly hard ground.
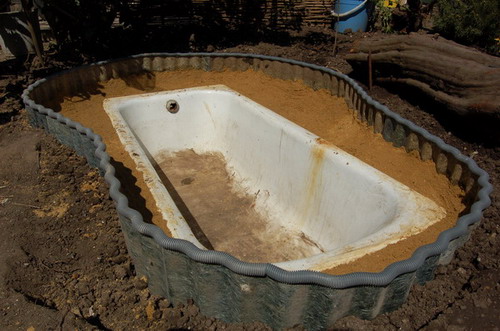
- We dig a hole in the size of the bath, a depth greater than its height by 30 cm. At a distance of about 50 cm from the edges of the bath, we remove the turf layer by 30 cm.
- We will establish a bath in the prepared pit, we will check up horizontality of its installation by means of level, we shall close a drain aperture and we will fill with water. Then fill the space around the tub with sand and a pound. The foundation of our pond is ready.
- We proceed to decorating, for this we spread the glue for the tiles according to the instructions, adding a dark dye into it. We will put the adhesive on the walls of the bath with a thin layer. You do not need to equalize the glue, the more unevenness results, the better. If the glue will be enough, then in the same way zadekoriruem and the bottom of the bath. Cover the bath with a film and leave to dry for a day.
- Nastelem grid, you can use it as a solid strip, and cut it into 4 parts. We close the upper edges of the bath and the walls to half the depth with the net. At the corners, we fix on the grid the rings from the wire, necessary for horizontal shelves in the corners of the bath.
- Prepare the cement slurry and apply it to the mesh, while inserting decorative stones. Align the solution and cover it with a net completely unnecessary, simply fix the mesh and stones. Immediately seal the drain hole and leave it to dry for a few days.
- Prepare a thick clay solution and apply it to the walls of the bath, covering the concrete and cracks in the stones. At the same time, the roots of moisture-loving plants can be attached to the upper parts of the walls. At the bottom of the bath we will fill the dry clay with a layer of several centimeters.
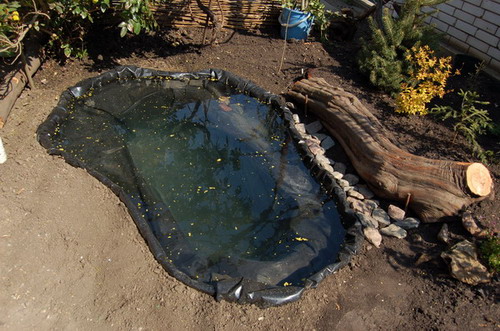
- Fill the pond with water, feeding it slowly, scattering the jet, so as not to wash the clay. Our pond from the old bath is ready.
- We will populate our pond, for this, several water plants and a small amount of silt should be brought from a natural reservoir. In the groove around our pond lay out large stones and plant marsh plants, and inward we will plant aquatic plants.
- Change the water in the pond is not necessary, so as not to disturb the natural balance that exists in it. It is only necessary to compensate for that part of the water that will disappear through evaporation. For the winter, it is not superfluous to throw a few empty plastic bottles into the pond, so that the expanding ice pushes them out.
| | |
| | |