Meat grinder - the device is indispensable in the kitchen for many years. Even the most modern combine can not prepare minced meat, to which we are accustomed. Many people think that the electric analog of a manual grinder is too complex in the assembly. In fact, both options are simple enough to assemble and bring into working order. Consider the sequence of actions for each model.
How correctly to collect a manual meat grinder?
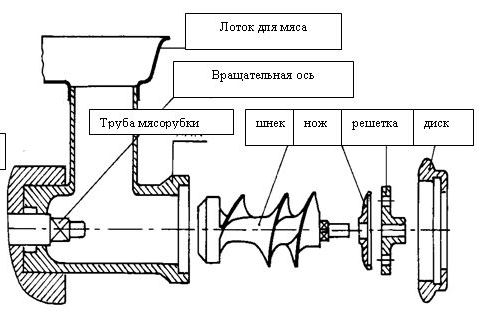
Most housewives in kitchens have hand-held meat grinders. Therefore, first of all we will collect this particular variant from such components as auger shaft, knife, grate, lid-latch, body and handle. Here is a step-by-step instruction on how to assemble a manual meat grinder:
- First you need to install the auger shaft in the body of the device. From one end you will find a special thickening on the shaft, a handle is put on it. It is necessary to insert the shaft exactly at this end, and then make sure that the end has come out and you can attach the handle to it. Before you collect a mechanical meat grinder, you can drop a little vegetable oil into the place of contact of the shaft with the body, then it will be easier to work.
- Then we fasten the knife. It has the form of a cross or propeller. Wear it in such a way that the flat side looks outward. To collect a manual meat grinder follows exactly this way, otherwise the meat will simply not be scrolled.
- After the knife, install the grate. All is fixed by means of the latch cover, it is wound on the thread on the body.
- On the back side, using a screw, fix the handle. The meat mincer is collected. You can attach it with a clamp to the countertop and start cooking.
How to assemble an electric meat grinder?
The assembly of this technique is not much different from the assembly of the classic manual grinder. Consider how to assemble an electric meat grinder:
- First, we do all the steps that were described in the assembly of the manual grinder. Additionally, a ring and a cap are put on the auger shaft, then a knife and a grid are fixed. The entire structure is installed in the body of the nozzle. Fix with a nut ring.
- Next, the ready-made prefix-grinder is attached to the actuator and fixed, turning the nozzle counter-clockwise until the moment it takes a vertical position.
- Then place the cup on the casing.
- Remove the power cord from the drive bay and connect the device to the mains.