Molding is an integral part of the child's mental and creative development. Work with plastic materials also contributes to the development of fine motor skills of the child's hands and, as a consequence, to his thinking and development of speech centers. Children are easiest to sculpt figurines from plasticine, as it does not wither and at any time the child can transform the resulting object into another. As the baby develops, it goes from modeling simple figures to more complex ones. In this article we will talk about how to teach a child to sculpt flowers from plasticine.
How to make flowers from plasticine with your own hands
The principle of modeling any colors from plasticine is similar. In the beginning, it is necessary to mold out all the elements necessary for the future craftsmanship separately and then connect them.
For modeling with children it is best to use clay, medium softness, which does not stick to your hands. Of too soft plasticine, making the handicraft will be difficult, because small parts will not keep the shape, and hard plasticine - a heavy material in the modeling for young children.
The color palette of plasticine today is diverse, because you can choose any color: from dark to very bright shades.
How to mold flowers from plasticine?
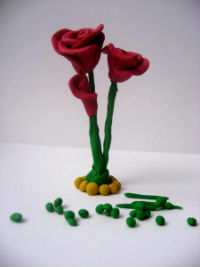
One of the most complicated in modeling, but, nevertheless, beautiful flowers is a rose. For its manufacture we will need:
- plasticine, red, green and yellow colors;
- a few toothpicks.
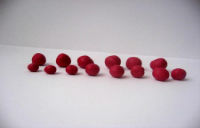
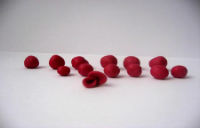
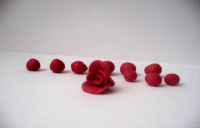
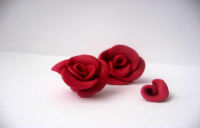
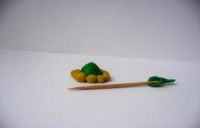
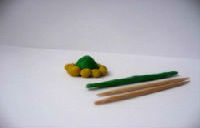
- From the softened plasticine of red color we roll 13-15 balls of different size. This is necessary to maintain the proportions of the bud of the future rose. Each of the balls squeezes a little with your fingers, giving them the shape of a petal. The resulting petal is folded, forming a bud. In the middle of the rose petals we gather tightly, and at the edges attach them so that they move away from the bud.
- After the heads of the flowers are made, proceed to the molding of the base. Since the roses will stand, we form a kind of flowerbed. To do this, we make a ball of green plasticine, squeeze it on one side, forming a base. At the edges attach to it balls of yellow or sand color. This will be the frame of the flower bed.
- Toothpick weave pieces of green plasticine and one end we stick them into the ready-made base, and at the other end we attach the flowers themselves.
- From the green plasticine we roll a few tubes and small balls. All the details are squeezed by fingers and, fastening them, we form the leaves. Roses are ready!
| | | |
| | | |
| | | |
Basket for flowers from plasticine
Already knowing how flowers are made, it is possible to offer the child to make a basket or vase with flowers from plasticine.
Vases and baskets are similar in technique. They differ only in the presence of a handle. Also the vase, if desired, can be given any shape.
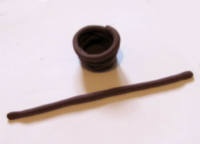
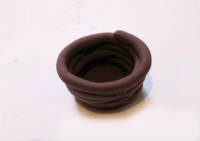
In order to make a basket of plasticine you will need a plasticine of brown color and a special knife for it.
- After stretching a piece of plasticine, divide it into two parts. From the first piece roll a ball and flatten it into a round cake. It will become the base of the basket for flowers.
- The second part of plasticine is divided into several smaller pieces and rolls all the pieces into flagella.
- Each of the plasticine flagella, lay out spirally from the bottom of the basket, slightly pressing down. Spirals attach the shape we need.
- The two remaining flagella weave together - this will be the handle of the basket. We attach it and our basket for flowers is ready.
- Having made roses, as in the previous master class, we can insert them into our basket.
| | | |
| | | |
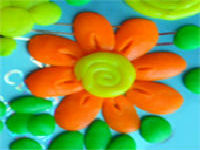
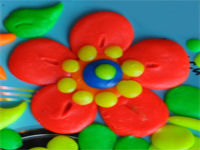
Picture flowers from plasticine
Having learned how to sculpt craftworks from plasticine in the form of flowers, you can decorate them in the whole picture.
As the basis of the picture, it is better to use old CDs, plates or glass. Cardboard, despite its availability, sometimes fails, since plasticine can subsequently leave on it fatty spots and spoil the original look of the picture.
For the picture, we need an unnecessary CD-ROM, toothpick and plasticine of different colors.
- Roll balls of plasticine of different colors and flatten them, giving the desired shape. It will be the petals, leaves and the core of the flowers in the future picture.
- We drive flags of green and red colors. Pressing them against the disc, we form the stems and buds of roses. For roses, flagella must be laid in a spiral.
- Leaflets and petals with a toothpick give a relief. Our picture is ready!
| | | |