Did you know that such a thing as usual for us, like a button, has a history of several thousand years. The first buttons appeared in the third (according to some versions, in the fifth) millennium BC. and for a long time they were used only as decoration. More utilitarian buttons with fastening loops appeared in Europe in the 13th century and still retain their functionality and popularity.
But today, when you are already surprised by the button as a clasp, this ingenious invention of humanity can again afford not only a useful adaptation. Now the buttons are the source of inspiration and the object of finding handymasters of all stripes. Priobschem and we are to button art and learn some handmade items made from buttons for children.
Children's hand-made articles from buttons
If you have a lot of old, "incomplete" buttons in some jewelry box with sewing accessories, you can make a lot of interesting crafts from them.
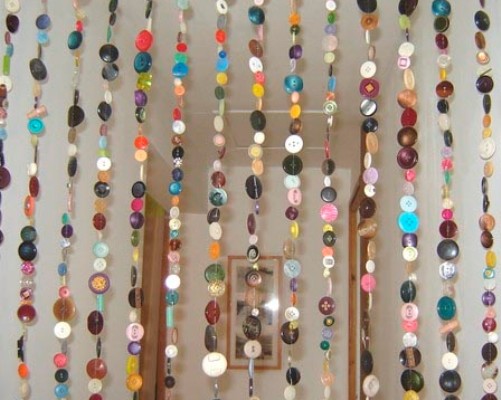
With the help of a fishing line from a large number of buttons, you can make a curtain that perfectly complements any interior.
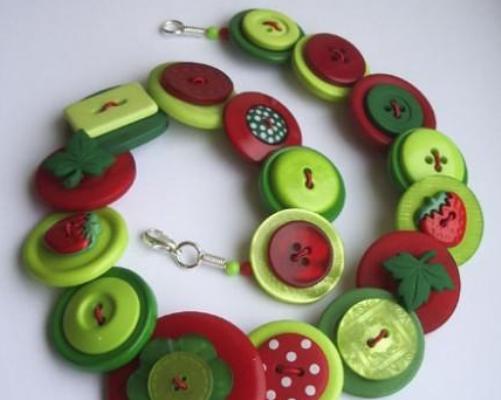
Girls will be interested to create from buttons all sorts of jewelry: earrings, brooches, bracelets, beads - in addition for this you will need a special fittings for jewelry, which can be bought at a specialized store.
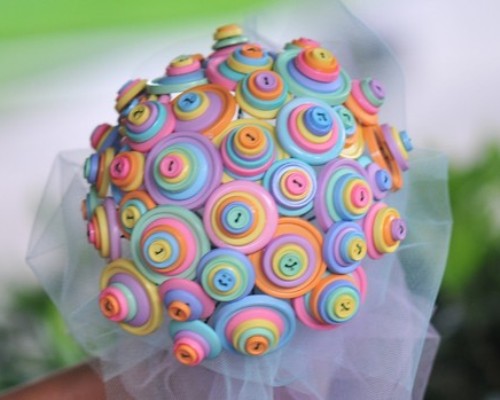
Very interesting and original are exquisite bouquets of buttons, they can be used for interior decoration or present as a gift.
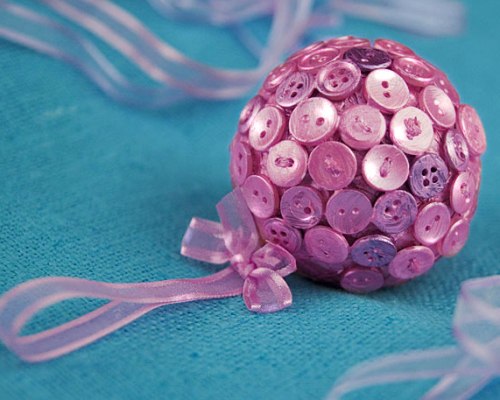
On the eve of New Year's holidays, offer your child to make unusual Christmas balls with buttons.
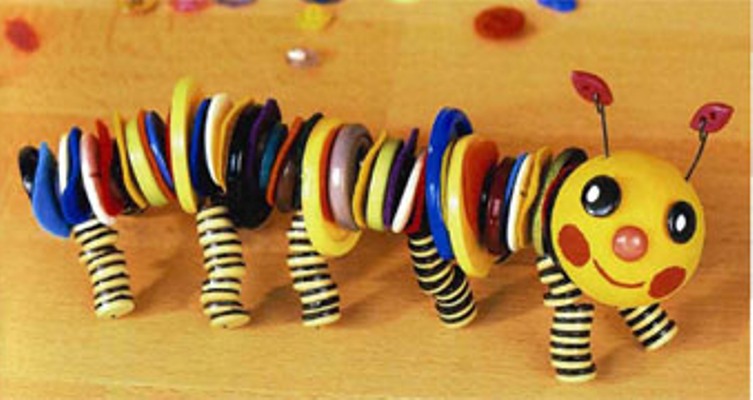
Let's take a closer look at how to make a hand-made article from the buttons "Centipede".
This will require:
- Actually buttons of any sizes and colors;
- wire thickness not more than 1 mm;
- cotton ball;
- acrylic paint yellow;
- permanent markers or simply markers;
- wire cutters or old scissors;
- universal adhesive.
- Bite off the wire length of 20 cm with wire cutters. Bend one end and twist it into a loop - the head will be fastened to it.
- On the wire, string multicolored buttons in random order - this will be the trunk. The free end of the wire is bent and threaded into the second hole of the last button, tighten.
- From 4-5 pieces of wire length of 10 cm in the same way make the feet. Use smaller buttons. Both free ends of each wire bend and fasten on the last buttons with glue. Bend each wire in half and secure the loop on the body at equal distances from each other.
- Wadded ball-head roll more tightly and paint with acrylic paint in yellow. After drying the paint, insert into the ball and fix with glue 2 pieces of wire 2 cm long - antennae. The ends of the antennae can be attached to a small button. The eyes and nose of the centipede can also be made of buttons, or painted with a marker.
We put the prepared head on the twisted loop of wire-trunk and fix it with glue. Done!