If you are going to do repairs in the house and are facing the choice of flooring, we offer you a fantastic option - to create decorative self-leveling floors with your own hands. It is known that the proposed type of coating is an expensive and complex production process, but it is entirely possible to produce the self-leveling floor, the main thing is to familiarize yourself with the installation process itself.
What is meant by the bulk 3D floor, how does such beauty come to life on the floor in its own apartment? Modern technologies are developing very rapidly, and we do not cease to be surprised at the innovative ideas of mankind. One of such achievements is considered a bulk 3D floor.
The advantages of self-leveling floors
Filling polymer 3D floors have excellent strength, endurance, resist thermal, chemical and mechanical damage, do not attract dust, are hygienic, environmentally friendly, they are easy to look after, and, importantly, they look quite aesthetically.
How to achieve a unique three-dimensional effect?
The technology for creating 3D bulk polymeric floors is designed to achieve an unrivaled 3D image, and you can do all the work yourself. If to explain in a nutshell, then this effect is achieved when a basic pattern is applied to the base concrete layer and filled with a transparent polymer layer from above. And the thicker this layer, the better the image.
The principle of laying a bulk three-dimensional floor
Installation of a bulk three-dimensional floor includes several successive stages.
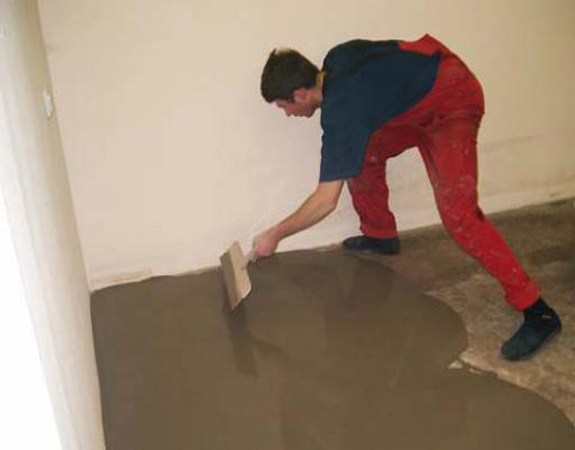
1. Substrate preparation
Preparation begins with grinding the concrete screed, and in the presence of cracks and small holes that are in the concrete, - cementing them with cement. After this, carefully remove any debris that has formed.
2. Base primer
Next, go to the primer, with it, fill the pores in the concrete, and then wait for the drying to take about 4 hours.
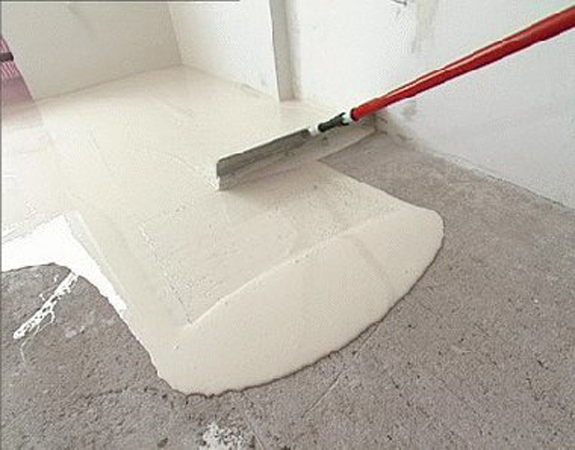
3. Applying the base layer
This layer is applied to the roughing base, after which it is necessary to go through a needle roller to remove air bubbles and level the resulting layer.
4. Image application
Next, we apply the image. Let's go to pasting the base base with a ready-made drawing, printed on a vinyl carrier. Before applying the pattern, we make the primer now base base, we wait for its polymerization, it will take at least 24 hours. After that, we glue the image on the primed base.
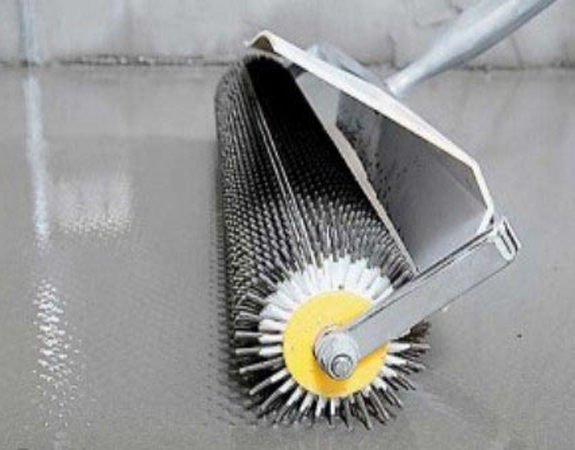
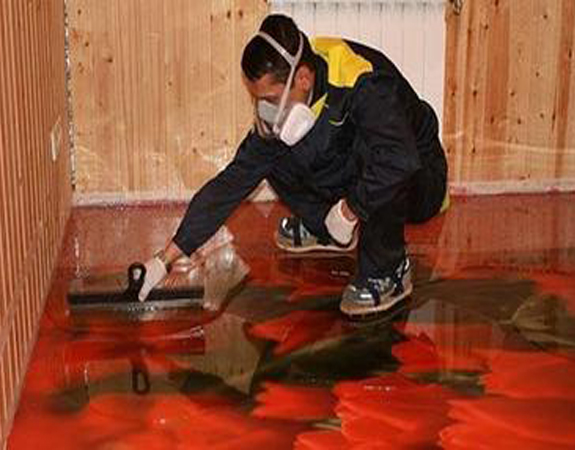
5. Finishing coat
Before installing the finish layer, we calculate its volume: if its possible thickness is not less than 3 mm per 1 sq. M. The floor goes to 5 kg of polymer transparent layer. To do this, mix all the components, pour a transparent layer on the applied pattern and align all along the perimeter. Finally, you need to go through the needle roller again. We are waiting for the hardening of the finish layer.
6. Application of protective varnish
The final stage is the application of a protective varnish, which will protect the finished floor from various damages, and will also make it easy to care for it. After coating with a layer of protective varnish, the flooring floor will be sufficiently cleaned with a damp cloth.
We hope that our master class on filling the filling floor will help you do everything, the same with your own hands.
The polymer filler can be insulated with a 3D floor. The technique of pouring is the same, simply before the concrete screed is laid on top of the floor surface, a heating system is installed. Thus, you can make a warm filler floor with your own hands.